Python Scripting in Nodlin

Introduction
Nodlin uses Starlark, a Python-like language, for scripting custom node behaviors. Starlark is simple, deterministic, and powerful—perfect for defining how nodes display, interact, and respond to events.
Why Starlark?
- Python-like syntax: Easy to learn if you know Python
- Deterministic: No hidden state or side effects
- Safe: Runs in a sandbox with controlled access
- Fast: Executes quickly for responsive UIs
What You Can Do
With Nodlin scripts you can:
- Define custom node types with unique behaviors
- Create interactive forms for data input
- Generate dynamic visuals (SVG, charts, textboxes)
- Link nodes and create relationships
- Respond to user actions and events
- Manage user actions and assignments
Related Documentation
- Starlark Extensions API - Complete API reference for Nodlin extensions
- Forms Guide - Creating interactive forms
- Images Guide - Creating node visuals
- Starlark Language Spec - Official language reference
- Starlark in Go - Implementation details
When to Use Scripts vs Internal Types
Use scripts when:
- You need custom business logic
- You want domain-specific node types
- You need computed properties or dynamic behavior
Use internal types (expressions, notes, etc.) when:
- Simple calculations suffice
- No custom logic needed
- Standard Nodlin features meet your needs
Getting Started
Your First Script
Let’s create a simple custom node that displays a welcome message:
# Set the node's display label
node.label = "Welcome to Nodlin"

# Create a simple summary
node.summary = "This is my first custom node!"

# Add help text
node.help = "Custom nodes can display dynamic content and respond to user actions."
That’s it! This script:
- Sets the node’s label (what appears in the graph)
- Provides a summary (shows in the detail panel)
- Adds help text (available via the help button)
Script Anatomy
Every Nodlin script has access to several pre-declared variables:
node- The current node being renderedoperation- Information about the current operation (user actions, etc.)context- Access to connected nodes and graph contextfactory- Create new nodes, links, and forms
See the Starlark Extensions API for complete details.
Script Organization (Best Practices)
Based on production scripts, organize your code like this:
# 1. Constants at the top
TYPE = "myType"
STATUS_NEW = "new"
STATUS_ACTIVE = "active"

# 2. Helper functions
def sanitize_text(text):
    """Remove problematic characters"""
    return text.replace('"', '').replace("'", '')

def calculate_progress(completed, total):
    """Calculate percentage complete"""
    if total == 0:
        return 0
    return int(100 * completed / total)

# 3. Defaults dictionary (for form initialization)
defaults = {
    "title": "",
    "status": STATUS_NEW,
    "priority": "medium",
}

# Initialize from existing node data
for key in defaults:
    if key in node.data:
        defaults[key] = node.data[key]

# 4. Action handlers (if user clicked a button)
if operation.isAction("submit"):
    # Handle submission
    node.data["status"] = STATUS_ACTIVE
    node.data["submittedAt"] = time.now().format("2006-01-02")

# 5. Form creation (if needed)
if operation.isEdit():
    form = factory.form()
    form.textInput("title", "Title", defaults["title"])
    form.select("status", "Status", defaults["status"],
                [STATUS_NEW, STATUS_ACTIVE])
    node.form = form

# 6. Node properties (always at the end)
node.label = defaults.get("title", "Untitled")
node.summary = "Status: " + defaults.get("status", "unknown")
This structure keeps scripts organized and maintainable.
Execution Model
Scripts run every time the node is rendered. This means:
- Keep scripts fast (they run frequently)
- Use checkpoints to cache expensive operations
- Avoid side effects (scripts should be deterministic)
- Scripts cannot directly modify other nodes (use actions instead)
Scripts execute in response to:
- Node creation
- Node opening/viewing
- User actions (button clicks)
- Edit mode activation
- Related node changes
Debugging Tips
Use print() to debug:
print("Current status:", node.data.get("status", "none"))
print("Connected nodes:", len(context.nodes))
Print output appears in:
- The browser console (F12 → Console tab)
- Server logs (for server-side execution)
Common debugging patterns:
# Check if data exists
if "myField" in node.data:
    print("myField value:", node.data["myField"])
else:
    print("myField not set")

# Inspect connected nodes
for n in context.nodes:
    print("Connected:", n.label, "Type:", n.type)

# Debug action handling
if operation.isAction():
    print("Action triggered:", operation.action)
Core Concepts
Pre-declared Variables
Every script has access to these reserved variables (you cannot redefine them):
context(aliasC) - Request context, user info, checkpoint creation, ID generationnode- The current node, its data, and methods for creating linksoperation- Information about the current request (action name, edit mode, etc.)factory- Create new nodes, links, forms, and UI elements
See the Starlark Extensions API for full API documentation.
Quick Reference
# Context
context.userID           # Current user (userid, domain)
context.nodes            # Connected nodes
context.checkpoint()     # Create checkpoint for dependent operations
context.newNodeID()      # Generate new node ID

# Node
node.id                  # Node identifier
node.type                # Node type
node.data                # Dictionary of node data
node.label = "text"      # Set display label
node.summary = "text"    # Set summary text
node.image = "<svg>..." # Set visual representation
node.form = form         # Attach form for editing

# Operation
operation.isAction("name")  # Check if action was triggered
operation.isEdit()           # Check if in edit mode
operation.action             # Action name (if any)

# Factory
factory.form()              # Create new form
factory.node(type, label)   # Create new node
factory.link(from, to)      # Create link between nodes
Checkpoints
Checkpoints sequence dependent operations. When you need one operation to complete before another starts, use checkpoints.
When to Use Checkpoints
Use checkpoints when:
- Creating a node that links to another new node
- Performing actions that depend on previous actions succeeding
- Chaining multiple operations that must execute in order
How Checkpoints Work
- Create checkpoint:
context.checkpoint()creates a boundary - Next operations wait: Any operations after the checkpoint wait for current script to succeed
- On success: Queued operations execute (possibly in parallel)
- On failure: Queued operations are skipped
See How does Nodlin manage the propagation of change? for details.
Example: Creating and Linking a New Node
if operation.isAction("createTask"):
    # Create checkpoint so new node only created if this script succeeds
    context.checkpoint()

    # Create and link new task node
    new_task_id = node.linkToNewNode(
        FQN="my_domain_task",
        label="New Task"
    )

    print("Task will be created:", new_task_id)
Note: node.linkToNewNode() simplifies the common pattern of creating a node and linking to it. It handles checkpoint creation internally. Use explicit checkpoints when you need finer control.
Example: Chaining Multiple Operations
if operation.isAction("createProject"):
    # Checkpoint 1: Current script must succeed
    context.checkpoint()

    # Create project node
    project_id = factory.node("project", "New Project")

    # Checkpoint 2: Project creation must succeed
    context.checkpoint()

    # Create multiple tasks linked to project (these run in parallel)
    for task_name in ["Design", "Development", "Testing"]:
        task_id = factory.node("task", task_name)
        factory.link(project_id, task_id)
Node Properties
Nodes have several properties you can set to control their appearance and behavior:
Display Properties
# Label - appears in the graph
node.label = "My Node"

# Summary - shows in detail panel
node.summary = "This is a longer description of the node."

# Help text - available via help button
node.help = "Instructions for using this node."
Visual Properties
# Image - SVG or PNG for node visualization
node.image = "<svg>...</svg>"

# Size (for SVG images)
node.sizeX = 200  # Width in pixels
node.sizeY = 100  # Height in pixels
See the Images Guide for details on creating node visuals.
Interactive Properties
# Form - for editing node data
if operation.isEdit():
    form = factory.form()
    form.textInput("name", "Name", node.data.get("name", ""))
    node.form = form

# Warnings - display issues to users
if node.data.get("status") == "overdue":
    node.warning = "This item is overdue!"

# Errors - indicate problems
if "required_field" not in node.data:
    node.error = "Required field is missing"
Data Storage
# node.data is a dictionary
node.data["title"] = "New Title"
node.data["status"] = "active"
node.data["priority"] = 5

# Check if key exists
if "title" in node.data:
    print("Title:", node.data["title"])

# Get with default
title = node.data.get("title", "Untitled")

# Iterate over data
for key, value in node.data.items():
    print(key, "=", value)
Important: node.data persists between script executions. This is where you store user input and computed state.
Working with Relationships
Relationships connect nodes to create graphs. You can access connected nodes, create new relationships, and control relationship affordances.
Accessing Connected Nodes
Use node.related (or shorthand node.R) to access connected nodes:
# Check if relationship exists
if "expense" in node.related:
    expenses = node.related.expense.all()
    print("Found", len(expenses), "expenses")

# Iterate through all relationships
for relation_name in node.related:
    print("Relationship:", relation_name)
    for related_node in node.related[relation_name].all():
        print("  -", related_node.label)

# Access specific relationship and type
schedules = node.related.has_schedule.paymentSchedule
for schedule in schedules:
    print("Schedule:", schedule.data.get("years", "unknown"))
The hasOne() Helper
For one-to-one relationships, use hasOne() for cleaner code:
# Get single node (fails if >1, returns None if 0)
schedule = node.R.has_schedule.paymentSchedule.hasOne()
if schedule:
    print("Years:", schedule.data["years"])

# If only one type over the relationship
schedule = node.R.has_schedule.hasOne()

# Direct from node with relationship and type
schedule = node.hasOne("has_schedule", "paymentSchedule")
Warning: hasOne() fails if multiple nodes exist. Use for simple cases only. For robust scripts, check list length explicitly.
Accessing All Connected Nodes
Get all nodes regardless of relationship:
# All related nodes
for n in node.related.all():
    print(n.label, "-", n.type)

# Inspect properties
    for prop, value in n.data.items():
        print(f"  {prop} = {value} (type: {type(value)})")
Creating Relationships
Link to Existing Node
if operation.isAction("linkExpense"):
    # Get expense node ID from form
    expense_id = node.data["selectedExpenseId"]

    # Create link
    factory.link(
        fromNode=node.id,
        toNode=expense_id,
        relation="has_expense",
        label="Expense"
    )
Create and Link New Node
if operation.isAction("addTask"):
    # Checkpoint ensures node only created if script succeeds
    context.checkpoint()

    # Create new task node and link to current node
    task_id = node.linkToNewNode(
        FQN="my_domain_task",
        label="New Task",
        relation="has_task"  # Optional, defaults to type name
    )

    print("Created task:", task_id)
Note: linkToNewNode() handles checkpoints internally for the common case of creating and linking.
Relationship Affordances
Affordances define the typical node types can be linked. These should be defined for the nodes where the node logic refers to these related nodes for detail when executing. Define them in the script:
# Define what can be linked to this node
node.affordances = [
    {
        "relation": "has_task",
        "type": "my_domain_task",
        "label": "Task"
    },
    {
        "relation": "has_milestone",
        "type": "my_domain_milestone",
        "label": "Milestone"
    }
]
Affordances appear in the UI when users link nodes, guiding them to valid connections.
Note that definition of affordances is optional. In nodlin any node type can be linked.
Real Example: TOGAF Work Packages
From production scripts:
# Define affordances for architecture work packages
node.affordances = [
    {
        "relation": "hasArchitectureDomains",
        "type": TYPE.ARCHITECTURE_PROJECT,
        "label": "Architecture Project"
    },
    {
        "relation": "requiresWork",
        "type": TYPE.WORK_PACKAGE,
        "label": "Required Work Package"
    }
]

# Check for required dependencies
if "requiresWork" in node.related:
    dependencies = node.related.requiresWork.all()
    if len(dependencies) > 0:
        node.warning = f"Has {len(dependencies)} dependencies"
Actions and Assignments
Actions represent tasks or work items associated with nodes. Assignments link actions to users or groups.
Handling User Actions
Respond to button clicks using operation.isAction():
# Check for specific action
if operation.isAction("submit"):
    # Update node data
    node.data["status"] = "submitted"
    node.data["submittedAt"] = time.now().format("2006-01-02")

    # Create notification
    print("Submitted at", node.data["submittedAt"])

# Multiple actions
if operation.isAction("approve"):
    node.data["status"] = "approved"
elif operation.isAction("reject"):
    node.data["status"] = "rejected"
    node.data["rejectionReason"] = node.data.get("comment", "")
See the Forms Guide for creating buttons.
Checking Operation Type
# Check if any action occurred
if operation.isAction():
    print("Action triggered:", operation.action)

# Check if in edit mode
if operation.isEdit():
    # Show form
    form = factory.form()
    # ... add form fields
    node.form = form

# Check for events
if operation.isEvent("assigned"):
    print("Node was assigned")
Retrieving Node Actions
Get actions associated with a node:
# Get all actions for node
actions = node.getActions()

for action in actions:
    print("Action ID:", action.actionID)
    print("State:", action.state)
    print("Priority:", action.priority)
    print("Created by:", action.createdBy)
    print("Users:", action.allUsers())
    print("Groups:", action.allGroups())
Action properties:
actionID,active,comment,priorityforDate,state,successCondition,completedcreatedAt,updatedAt,startedAt,completedAtassignments,createdBy
Assignment properties:
assignmentID,active,assignedAtassignee,assignedTo,assignedToGroup
Creating Actions and Assignments
if operation.isAction("createTask"):
    context.checkpoint()  # Ensure node exists

    # Create new task node
    task_id = node.linkToNewNode(
        FQN="my_domain_task",
        label="New Task"
    )

    # Create action with due date
    context.checkpoint()  # Action needs node to exist
    due_date = time.now() + time.parse_duration("24h")
    action_id = node.createAction(
        nodeid=task_id,
        forDate=due_date,
        comment="Please complete this task"
    )

    # Assign to user
    context.checkpoint()  # Assignment needs action
    assignment_id = node.createAssignment(
        nodeid=task_id,
        actionid=action_id,
        user=("username", "domain")
    )
Shorthand for action + assignment:
# Create action and assignment in one call
action_id, assignment_id = node.assignNewAction(
    comment="Review required",
    user=("reviewer", "my_domain")
)
Real Example: Incident Status Workflow
From production scripts:
# Handle incident workflow actions
if operation.isAction("investigate"):
    node.data["status"] = "investigating"
    node.data["startTime"] = time.now().format("2006-01-02 15:04:05")

elif operation.isAction("resolve"):
    node.data["status"] = "resolved"
    node.data["endTime"] = time.now().format("2006-01-02 15:04:05")

elif operation.isAction("close"):
    node.data["status"] = "closed"
    node.data["closedAt"] = time.now().format("2006-01-02")

# Set warning if incident is taking too long
if node.data.get("status") == "investigating":
    start = time.parse("2006-01-02 15:04:05", node.data.get("startTime", ""))
    if start:
        duration = time.now() - start
        if duration > time.parse_duration("4h"):
            node.warning = "Incident investigation exceeds 4 hours"
Expressions
For simple calculated values, use expression nodes instead of full scripts. Expressions are Python-like formulas that compute numeric, boolean, object, or list results.
Expression Basics
# Numeric expression
42 * 1.5 + 10

# Boolean condition
total > 1000 and status == "approved"

# Using related nodes via related() function
sum(related(prop="cost"))
max(related(prop="priority"))
avg(related())
The related() Function
Access properties from connected nodes:
# Get all 'cost' properties from related nodes
related(prop="cost")

# Filter by relationship
related(prop="amount", relation="expense")

# Filter by relationship and type
related(prop="value", relation="hasTask", type="task")

# Get default property (value for numbers, condition for booleans)
related()  # Same as related(prop="value")
Examples:
# Sum all expense amounts
sum(related(prop="amount", relation="expense"))

# Maximum priority across tasks
max(related(prop="priority", relation="hasTask"))

# Count related items
len(related())

# List comprehension for filtering
sum([x for x in related(prop="cost") if x > 100])
Referencing Named Nodes
Expressions can reference aliased nodes by name:
# If a node has alias="subtotal"
subtotal * 1.2  # Add 20% to subtotal

# Combine multiple named nodes
grossIncome - expenses - taxes
See the Advanced Topics section for node aliases.
Math Functions
Available in expressions:
# Statistics
avg(related())
sum(related())
max(related())
min(related())

# Math operations
abs(-5)
round(3.7)
pow(2, 8)  # 2^8
Expression vs Script
Use expressions when:
- Simple calculation
- No side effects needed
- Result is a single value
Use scripts when:
- Complex logic required
- Need to create nodes/links
- Need forms or custom UI
- Multiple actions or state changes
Creating Forms
Forms enable user input for node data. They support text inputs, selects, dates, lists, and more.
See the Forms Guide for complete documentation.
Quick Example
if operation.isEdit():
    form = factory.form()

    # Text input
    form.textInput("title", "Title", node.data.get("title", ""))

    # Select dropdown
    form.select("status", "Status",
                node.data.get("status", "new"),
                ["new", "active", "completed"])

    # Date input
    form.dateInput("dueDate", "Due Date",
                   node.data.get("dueDate", ""))

    # Multiline text
    form.textArea("description", "Description",
                  node.data.get("description", ""))

    # Buttons
    form.addButton("save", "Save")
    form.addButton("cancel", "Cancel")

    node.form = form
Form Features
- Input controls: text, number, date, checkbox, select, textarea
- User selection: user pickers, group pickers
- Organization: groups, columns, tabs
- Lists: dynamic repeating sections
- Static content: markdown, help text
- Validation: required fields, error messages
Creating Node Visuals
Nodes can display custom visuals using SVG, PNG, or specialized components.
See the Images Guide for complete documentation.
Quick Examples
SVG Image
# Direct SVG
node.image = '''<svg width="200" height="100">
    <rect width="200" height="100" fill="#4CAF50"/>
    <text x="100" y="55" text-anchor="middle"
          fill="white" font-size="20">Active</text>
</svg>'''
node.sizeX = 200
node.sizeY = 100
Status Badge Example
def status_badge(status):
    colors = {
        "active": "#4CAF50",
        "pending": "#FFC107",
        "completed": "#2196F3"
    }
    color = colors.get(status, "#999")

    return '''<svg width="120" height="40">
        <rect width="120" height="40" rx="5" fill="%s"/>
        <text x="60" y="25" text-anchor="middle"
              fill="white" font-size="14">%s</text>
    </svg>''' % (color, status.upper())

node.image = status_badge(node.data.get("status", "pending"))
node.sizeX = 120
node.sizeY = 40
Textbox with Icon
# Using material design icon
from nodlin.textbox import textbox

tb = textbox(
    icon="mdi:check-circle",
    iconColor="#4CAF50",
    text=node.label,
    fontSize=16
)
node.image = tb.svg()
node.sizeX = tb.width
node.sizeY = tb.height
Image Features
- SVG images: Direct SVG, parameterized templates, programmatic generation
- PNG images: Base64-encoded bitmaps
- Textbox: Quick text + icon display
- Gridder: Programmatic SVG layout
- Quickchart: Charts and graphs
- Helpers: Text truncation, escaping, safe formatting
Advanced Topics
Deleting a node
Nodlin allows for actions to be triggered from scripts. The standard actions are ‘create’ and ‘delete’ and supported by all node types.
For the script agent, the specific action name is processed as a ‘create’ action but with a specific action name determined from meta-data passed through to a script.
To delete a node, you can use the ‘delete’ action name for a specific nodeid.
The following is an example (that can be associated with a form button) that will process a delete request for an associated node (a nodeid and type):
if type(operation) == "Action" and operation.name == "deleteInternalTask":
	# find the related task node and delete it
	if 'myInternalTask' in V.related:
      relatedTask = V.related.myInternalTask.hasOne()
      if relatedTask:
        node.actionNode(action="delete", nodeid=relatedTask.nodeID, FQN=relatedTask.nodeType)
      else:
        print("request to delete a related task and no related task found")
else:
print("action did not match, operation is", operation)
Named Nodes and Aliases
Nodes can have aliases (names) for easy reference in expressions and scripts, similar to named cells in spreadsheets.
Setting an Alias
# Set alias for the current node
node.setName("projectBudget")

# Now other nodes can reference this node by name
Using Named Nodes
The named dictionary provides access to related nodes by alias:
# Check if named node exists
if "subtotal" in named:
    total = named["subtotal"].data.get("amount", 0) * 1.2

# Iterate through named nodes
for name in named:
    print(f"Named node: {name}")
    node_ref = named[name]
    print(f"  Label: {node_ref.label}")
    print(f"  Type: {node_ref.type}")
Scope: Only directly related nodes’ aliases are accessible. Names must be unique among related nodes.
Priority: Aliases set via setName() override user-defined aliases from the UI.
The values Dictionary
For expression nodes, the values dictionary provides computed results:
# Access computed value from expression node
if "taxRate" in values:
    tax = values["taxRate"] * subtotal

# Values dict translates JSON results to proper types
# (numbers, booleans, lists, objects)
credit = values.get("creditAmount", 0)
Default Values and getattr
Avoid repetitive existence checks with defaults:
# Instead of this:
if hasattr(expense, "value"):
    total = total + expense.value
else:
    total = total + 0

# Use getattr with default:
total = total + getattr(expense, "value", 0)

# For dictionaries, use .get():
title = node.data.get("title", "Untitled")
status = node.data.get("status", "pending")
Syntax:
getattr(object, attribute_name, default_value)dictionary.get(key, default_value)
List Comprehensions
Powerful list transformations:
# Create combined list
nums = [1, 2, 3]
letters = ['A', 'B', 'C']
combined = [[n, l] for n in nums for l in letters]
# Result: [[1, 'A'], [1, 'B'], [1, 'C'], [2, 'A'], ...]

# Dictionary comprehension
dict_comp = {x: chr(65+x) for x in range(1, 11)}
# Result: {1: 'B', 2: 'C', 3: 'D', ...}

# Filter with comprehension
high_priority = [t for t in tasks if t.data.get("priority", 0) > 5]

# Check all values meet condition
customers = [{"verified": False}, {"verified": True}]
all_verified = all([c["verified"] for c in customers])
# Result: False
String Handling
Raw Strings
Use raw strings (prefix r) for quotes and special characters:
# Useful for SVG with embedded quotes
mySVG = r'<svg id="main" width="512" height="512">
    <circle cx="256" cy="256" r="100" fill="blue"/>
</svg>'

node.image = mySVG
String Formatting
Starlark supports string interpolation:
x = 0.5
print("Float: %f" % x)    # 0.500000 (long form)
print("Compact: %g" % x)  # 0.5 (compact)
print("String: %s" % x)   # str(x)
print("Repr: %r" % x)     # repr(x)

# Format codes:
# %s - string        %d - decimal integer
# %f - float         %g - compact float
# %x - hex           %o - octal
# %e - exponential   %% - literal %
Error Handling
Stop script execution with fail():
# Validate required fields
if "title" not in node.data:
    fail("Title is required")

# Validate relationships
if "project" not in node.related:
    fail("Task must be linked to a project")

# Validate data types
if not isinstance(node.data.get("priority"), int):
    fail("Priority must be an integer")
Note: fail() stops execution immediately. Use for critical errors only. For non-critical issues, set node.warning or node.error instead.
Fully Qualified Names (FQN)
Nodlin uses FQNs to avoid ambiguity:
Format: domain_user_agentName_relationship
Example: core_all_scriptAgent_depends_on
Short forms: You can often use shortened names:
depends_oninstead ofcore_all_scriptAgent_depends_onopenQuestion(camelCase) instead ofagr_core_all_workflowAgent_open_question
User labels: Can also be used but must match exactly (case and spaces).
# FQN
node.linkToNewNode(FQN="agt_core_all_task_node", label="Task")

# Short form in relationships
if "depends_on" in node.related:
    dependencies = node.related.depends_on.all()

# User label (exact match)
expenses = related(relation="my expense")
Standard Libraries
Nodlin includes several standard libraries for common tasks.
datetime
Date and time manipulation:
import datetime

# Create date
t = datetime.Date(year=2025, month=8, day=19, tz="Europe/London")
print("Date:", t)

# Start of month
start = datetime.StartOfMonth(t)
formatted = datetime.Format(start, "2006-01-02")
print("Month start:", formatted)  # 2025-08-01

# End of month
end = datetime.EndOfMonth(t)
print("Month end:", datetime.Format(end, "2006-01-02"))  # 2025-08-31

# Days in month
days = datetime.DaysInMonth(t)  # 31

# Add months
next_month = datetime.AddMonths(t, 1)

# Truncate to day (remove time)
today = datetime.TruncateToDay(datetime.Now(tz="UTC"))

# Get first day of each month in range
start_date = datetime.Date(year=2024, month=11, day=15, tz="UTC")
end_date = datetime.Date(year=2025, month=2, day=3, tz="UTC")
first_days = datetime.FirstDaysForMonths(start_date, end_date)
# Returns: [2024-11-01, 2024-12-01, 2025-01-01, 2025-02-01]
Date format: Go’s reference format 2006-01-02 15:04:05
time
Time operations and parsing:
import time

# Current time
now = time.now()
print("Now:", now)

# Format time
formatted = now.format("2006-01-02 15:04:05")
print("Formatted:", formatted)

# Parse duration
one_day = time.parse_duration("24h")
tomorrow = now + one_day

# Duration units: "ns", "us", "ms", "s", "m", "h"
four_hours = time.parse_duration("4h")
thirty_mins = time.parse_duration("30m")
combined = time.parse_duration("1h30m")

# Parse time string
parsed = time.parse("2006-01-02", "2025-08-19")

# Unix timestamp
unix_time = time.from_timestamp(1234567890, 0)

# Time properties
print("Year:", now.year)
print("Month:", now.month)
print("Day:", now.day)
print("Hour:", now.hour)
print("Minute:", now.minute)

# Generate date list
dates = [(time.now() + time.parse_duration("24h") * i).format("2006-01-02")
         for i in range(30)]
# 30 days starting today
math
Mathematical functions:
import math

# Basic operations
math.abs(-5)      # 5
math.ceil(3.2)    # 4
math.floor(3.8)   # 3
math.round(3.6)   # 4
math.pow(2, 8)    # 256
math.sqrt(16)     # 4

# Trigonometry
math.sin(1.5)
math.cos(1.5)
math.tan(1.5)

# Constants
math.pi           # 3.141592...
math.e            # 2.718281...

# Min/Max
math.min(5, 10)   # 5
math.max(5, 10)   # 10
json
JSON encoding and decoding:
import json

# Encode to JSON string
data = {"name": "Task 1", "priority": 5, "tags": ["urgent", "review"]}
json_string = json.encode(data)
print(json_string)  # {"name":"Task 1","priority":5,...}

# Decode from JSON string
json_str = '{"status":"active","count":42}'
decoded = json.decode(json_str)
print(decoded["status"])  # "active"
print(decoded["count"])   # 42

# Use for complex data storage
node.data["config"] = json.encode({
    "theme": "dark",
    "notifications": True,
    "limits": {"max": 100, "min": 0}
})

# Later retrieve and decode
if "config" in node.data:
    config = json.decode(node.data["config"])
    print("Theme:", config["theme"])
Common Patterns
These patterns are extracted from production scripts and represent best practices.
Complete Script Structure
Organize your script following this proven pattern:
"""
Script documentation:
- Purpose and overview
- Properties defined
- Relationships used
- Actions available
"""

# 1. Debugging header
print("Executed @ %s by %s" % (time.now(), context.userID))

# 2. Constants
TYPE_TASK = "my_domain_task"
TYPE_MILESTONE = "my_domain_milestone"
REL_HAS_TASK = "hasTask"
ACTION_CREATE_TASK = "createTask"

# 3. Affordances (define allowed relationships)
node.affordances = [
    {"relation": REL_HAS_TASK, "type": TYPE_TASK, "label": "Task"}
]

# 4. Defaults with initialization loop
defaults = {
    "name": "",
    "status": "active",
    "priority": 5,
}

for key, default_value in defaults.items():
    if key not in node.data:
        node.data[key] = default_value

# 5. Helper functions
def sanitize_text(text):
    """Remove problematic characters for display"""
    return text.replace('"', '').replace("'", '')

# 6. Action handlers
if operation.isAction(ACTION_CREATE_TASK):
    context.checkpoint()
    node.linkToNewNode(
        FQN=TYPE_TASK,
        label="New Task",
        relation=REL_HAS_TASK
    )

# 7. Form creation (if in edit mode)
if operation.isEdit():
    form = factory.form()
    form.textInput("name", "Name", node.data.get("name", ""))
    form.addButton(ACTION_CREATE_TASK, "Create Task")
    node.form = form

# 8. Node properties (always at end)
node.label = node.data.get("name", "Untitled")
node.summary = f"Status: {node.data.get('status', 'unknown')}"
Aggregating Data from Related Nodes
Collect and summarize information from connected nodes:
# Initialize summary structure
if "summary" not in node.data:
    node.data["summary"] = {
        "taskCount": 0,
        "completedCount": 0,
        "totalEffort": 0
    }

# Reset counters
summary = node.data["summary"]
summary["taskCount"] = 0
summary["completedCount"] = 0
summary["totalEffort"] = 0

# Aggregate from related tasks
if "hasTask" in node.related:
    tasks = node.related.hasTask.all()
    summary["taskCount"] = len(tasks)

    for task in tasks:
        if task.data.get("status") == "completed":
            summary["completedCount"] += 1

        effort = task.data.get("effort", 0)
        summary["totalEffort"] += effort

# Calculate completion percentage
if summary["taskCount"] > 0:
    completion = int(100 * summary["completedCount"] / summary["taskCount"])
    node.label = f"{node.data.get('name', 'Project')} ({completion}%)"
else:
    node.label = node.data.get("name", "Project")
Recursive Aggregation Pattern
From TOGAF scripts - aggregate data across the entire subgraph:
def initSummary(node):
    """Initialize summary structure"""
    if "entitySummary" not in node.data:
        node.data["entitySummary"] = {
            "tasks": {},
            "milestones": {},
            "issues": {}
        }

def registerEntity(node, entityType, entityID, name):
    """Register an entity in the summary"""
    if not name or name.strip() == "":
        return

    summary = node.data["entitySummary"]
    if entityType not in summary:
        summary[entityType] = {}

    summary[entityType][entityID] = name

def aggregateSummaries(node, currentNode):
    """Collect summaries from all related nodes recursively"""
    initSummary(currentNode)

    # Register current node's entities
    if "hasTask" in node.related:
        for task in node.related.hasTask.all():
            registerEntity(currentNode, "tasks", task.id, task.label)

    # Aggregate from related nodes
    for related_node in node.related.all():
        if "entitySummary" in related_node.data:
            # Merge related node's summary into current
            related_summary = related_node.data["entitySummary"]
            current_summary = currentNode.data["entitySummary"]

            for entity_type, entities in related_summary.items():
                if entity_type not in current_summary:
                    current_summary[entity_type] = {}

                for entity_id, entity_name in entities.items():
                    current_summary[entity_type][entity_id] = entity_name

# Use the pattern
aggregateSummaries(node, node)

# Display counts
task_count = len(node.data["entitySummary"].get("tasks", {}))
milestone_count = len(node.data["entitySummary"].get("milestones", {}))

node.summary = f"Tasks: {task_count}, Milestones: {milestone_count}"
Dynamic Dashboard with HTML
Create visual dashboards using HTML (from TOGAF architectureProject.star):
# Get counts
task_count = len(node.related.hasTask.all()) if "hasTask" in node.related else 0
active_count = len([t for t in node.related.hasTask.all()
                    if t.data.get("status") == "active"]) if "hasTask" in node.related else 0

# Build dashboard HTML
dashboard_html = '''<div style="padding: 20px; background: linear-gradient(135deg, #667eea 0%, #764ba2 100%);
                            border-radius: 8px; margin: 16px 0;">
    <div style="display: grid; grid-template-columns: repeat(3, 1fr); gap: 12px;">
        <div style="background: white; padding: 16px; border-radius: 6px; text-align: center;">
            <div style="font-size: 32px; font-weight: bold; color: #667eea;">''' + str(task_count) + '''</div>
            <div style="color: #666; font-size: 12px; margin-top: 4px;">Total Tasks</div>
        </div>
        <div style="background: white; padding: 16px; border-radius: 6px; text-align: center;">
            <div style="font-size: 32px; font-weight: bold; color: #4caf50;">''' + str(active_count) + '''</div>
            <div style="color: #666; font-size: 12px; margin-top: 4px;">Active</div>
        </div>
        <div style="background: white; padding: 16px; border-radius: 6px; text-align: center;">
            <div style="font-size: 32px; font-weight: bold; color: #ff9800;">''' + str(task_count - active_count) + '''</div>
            <div style="color: #666; font-size: 12px; margin-top: 4px;">Completed</div>
        </div>
    </div>
</div>'''

# Add to form
if operation.isEdit():
    form = factory.form()
    form.addStatic("_dashboard", "div", dashboard_html)
    node.form = form
Status-Based Warnings
Provide contextual warnings based on node state:
# Check for overdue tasks
if node.data.get("dueDate"):
    due = time.parse("2006-01-02", node.data["dueDate"])
    if due and time.now() > due:
        days_overdue = int((time.now() - due).hours / 24)
        node.warning = f"Overdue by {days_overdue} days!"

# Check for missing required relationships
if "hasProject" not in node.related:
    node.warning = "Task is not linked to a project"

# Check for incomplete data
required_fields = ["title", "assignee", "dueDate"]
missing = [f for f in required_fields if f not in node.data or not node.data[f]]
if missing:
    node.error = f"Missing required fields: {', '.join(missing)}"

# Validate data ranges
priority = node.data.get("priority", 0)
if priority < 1 or priority > 10:
    node.warning = "Priority should be between 1 and 10"
Troubleshooting
Debugging Strategies
Print Everything
Use print statements liberally during development:
# Script execution info
print("=" * 50)
print("Script:", node.type)
print("Node ID:", node.id)
print("User:", context.userID)
print("Time:", time.now())
print("Operation:", operation.action if operation.isAction() else "none")
print("=" * 50)

# Inspect node data
print("Node data keys:", list(node.data.keys()))
for key, value in node.data.items():
    print(f"  {key}: {value} (type: {type(value)})")

# Inspect relationships
print("Relationships:", list(node.related.keys()) if node.related else "none")
for rel_name in node.related:
    nodes = node.related[rel_name].all()
    print(f"  {rel_name}: {len(nodes)} nodes")
    for n in nodes:
        print(f"    - {n.label} ({n.type})")
Check for None and Empty Values
# Safe navigation
name = node.data.get("name", "")
if not name or name.strip() == "":
    print("WARNING: Name is empty")
    name = "Untitled"

# Check related nodes exist
if "hasTask" not in node.related:
    print("No tasks found")
else:
    tasks = node.related.hasTask.all()
    if not tasks:
        print("Tasks relationship exists but empty")
    else:
        print(f"Found {len(tasks)} tasks")
Common Errors
“Attribute not found” errors
Problem: Accessing non-existent fields
# BAD - fails if 'title' doesn't exist
title = node.data["title"]

# GOOD - provides default
title = node.data.get("title", "Untitled")

# GOOD - check first
if "title" in node.data:
    title = node.data["title"]
else:
    title = "Untitled"
Checkpoint Issues
Problem: Operations execute in wrong order or not at all
# BAD - link might fail because node doesn't exist yet
new_id = factory.node("task", "New Task")
factory.link(node.id, new_id)

# GOOD - checkpoint ensures node exists before linking
context.checkpoint()
new_id = factory.node("task", "New Task")
context.checkpoint()
factory.link(node.id, new_id)

# BETTER - use convenience function
node.linkToNewNode(FQN="my_task", label="New Task")
Type Errors
Problem: Performing operations on wrong types
# Check types before operations
priority = node.data.get("priority", 5)
if not isinstance(priority, int):
    print(f"WARNING: Priority is {type(priority)}, expected int")
    try:
        priority = int(priority)
    except:
        priority = 5

# Validate before arithmetic
count = node.data.get("count", 0)
if isinstance(count, int):
    new_count = count + 1
else:
    print(f"ERROR: count is {type(count)}, not int")
    new_count = 1
Performance Tips
Minimize Expensive Operations
# BAD - recalculates image every time
node.image = generate_complex_chart()

# GOOD - only regenerate when data changes
if "_last_data_version" not in node.data or node.data["_last_data_version"] != node.data.get("version"):
    node.image = generate_complex_chart()
    node.data["_last_data_version"] = node.data.get("version")
Use Checkpoints Wisely
# BAD - too many checkpoints slow execution
for i in range(100):
    context.checkpoint()
    node.linkToNewNode(FQN="task", label=f"Task {i}")

# GOOD - single checkpoint for batch
context.checkpoint()
for i in range(100):
    node.linkToNewNode(FQN="task", label=f"Task {i}")
Avoid Deep Recursion
# Be careful with recursive aggregation
processed = set()

def aggregate_recursive(current_node, depth=0):
    if depth > 10:  # Limit recursion depth
        print("WARNING: Max recursion depth reached")
        return

    if current_node.id in processed:
        return  # Avoid cycles

    processed.add(current_node.id)

    # Process current node
    # ...

    # Recurse to related nodes
    for related in current_node.related.all():
        aggregate_recursive(related, depth + 1)
Getting Help
- Check logs: Browser console (F12) and server logs show print() output
- Use dir():
print(dir(node))shows available methods and properties - Inspect examples: Review production scripts for patterns
- API reference: Starlark Extensions has complete API
- Starlark docs: Language spec for language features
All scripts (if fact any nodlin operation) execute within bounded checkpoints. The checkpoints are simply a list of references to operations (actions, events etc). The operation will only execute once its starting checkpoint is successful. The target checkpoint is only successful once all its dependent (prior) operations are successful. This allows you to form a chain of operations that execute in sequence.
Note that any nodlin operations performed (linkToNewNode, link, actionNode, createAction, etc) will be instructed within the current checkpoint, but new checkpoints can be created using the ‘checkpoint()’ method. If you wish to execute an operation immediately (without waiting for the current script to complete) then simply issue the nodlin operation. e.g.
...
if type(operation) == "Action" and operation.name == "createInternalTask":
    # execute without waiting for the current script to complete (so will execute irrespective of success of current script)
    node.linkToNewNode(FQN="agt_core_all_internalTest_task", label="myInternalTask")
Checkpoints are useful where you want to perform more than one operation where there are dependencies. For example, say you wanted to create and link to a new node, and create a reverse relationship from that new node. You cannot create a relationship between 2 nodes unless both exist. In this case you would create a checkpoint after creation of the new node, and prior to creating the relationship. e.g.
...
if type(operation) == "Action" and operation.name == "createInternalTask":
    context.checkpoint()
    newNodeID = node.linkToNewNode(FQN="agt_core_all_internalTest_task", label="myInternalTask")
    context.checkpoint()
    # create an additional inverse relationship from the new node created above (only if successful)
    node.link(fromNodeID=newNodeID, relation="back to source node")
As previously mentioned, please review How does Nodlin manage the propagation of change? or more detail on the background theory of checkpoints and operations and best practices for using checkpoints..
‘N’ or ’node’
Represents the current recorded version of the node. It represents the current version prior to any update.
It is readonly and cannot be changed.
N.related       # a list of relationships from the node
N.R             # abbreviated form of 'related'
N.data          # returns the data properties of the node
N.<property>    # returns a specific named data property of a node
The following methods on ’node’ allow specific nodlin operations to be performed:
N.hasOne()
N.setName()
N.linkToNewNode()
N.getFYIs()
N.getActions()
N.createAction()
N.createAssignment()
N.assignNewAction()
N.setAffordance()
N.actionNode()
Set Affordance (setAffordance)
In nodlin, a node can be connected to any other node. However, this does not mean that the relationship is meaningful to either node. A relationship is meaningful if one of the nodes has logic that utilises information from the other. It is likely that nodes in the same script package will have meaningful relationships (but this is not enforced). For example, a ‘cause/effect’ node may have 2 types of relationship (1. caused by, and 2. effects) and use detail in these related nodes.
For usability, you can define the ’expected’ type of relationships with the setAffordance method.
Relationships that are defined with setAffordance are displayed in the UI when a user right-clicks on a node (and on the node tab itself) and the user can select a related node to create. All user preferred nodes are shown in the list, although the ’expected’ relationships are shown at the top of this list.
For example, in the TOGAF framework (architecture modeling scripts) the ‘Architecture Project’ node defines the following typical relationships to allow quick creation of a stakeholder, requirement, principle etc:
    V.setAffordance(toSubType=STAKEHOLDER_TYPE, overRelation=REL_STAKEHOLDER, label="has stakeholder")
    V.setAffordance(toSubType=PRINCIPLE_TYPE, overRelation=REL_PRINCIPLE, label="has principle")
    V.setAffordance(toSubType=REQUIREMENT_TYPE, overRelation=REL_REQUIREMENT, label="has requirement")
    ...
When the user selects a new node/relationship to create, the related type and relation is automatically created (with an empty payload).
Relationships can be defined to node types in other script packages, internal nodes, or external nodes.
Note that no payload (no additional detail) can be specified for the new node being created. If it is required that the new node being created should be initialised from detail in the current node, then this new node should be explicitly created in the script (normally through an action where user has selected a button) and a payload with additional detail can be provided.
’named’
In nodlin nodes may have a ’name’ (aka ‘alias’) to allow for simple referencing of nodes from related nodes. This is useful in expressions (like a named cell in a spreadsheet).
This is a python dictionary where the key is the name and the value is the node. For example,
useNode = named["thename"]
print(named)
Users can define a name for a node when creating/updating nodes (setName()). This is represented in the internal properties as ‘__name’.
The names used in the script are ONLY those names of the directly related nodes. The name may be repeated in other nodes and will have no effect and cannot be referenced by their name. Names used across the related nodes (and the central node itself) therefore have to be unique. An error is reported otherwise. This is provided as a useful shorthand value and supports more readable code.
The named value of the current node can be referenced as well through this method but cannot be changed. Use V or ‘value’ to record changes to the current node properties.
If a name for a node is set in the script (aka setName()) then this will override the alias that the user may have defined on the UI.
examples of use:
# print the length of the connected named properties
print(len(named))

# print all the named properties
for name in named:
    print(name, named[name])

# check and use the value of a named node
if 'task' in named:
    myTaskTotal = myTotal + task.totalEffort
The ’named’ dictionary provides access to the complete node detail. You can access the properties of the node using the ‘.’ notation. In nodlin however the value property has a special meaning (see the expression type). The value property is a json string, that records the result of an expression. Typically however you will want to access the value of the expression whether it be a number (float64), boolean or list. The values dict maintains this translated detail.
‘values’
The values dictionary records all the values of related aliased nodes. The value property for expressions is a json string and can represent lists, numbers (float64), booleans etc. These related aliased values have been translated and available in the values dictionary.
if 'credit' in values:
    myBudget = myBudget + values['credit']
‘O’ or ‘operation’
Represents the operation for which the script is executing. This could be an action (create, update) or an event from a related node.
The operation is used in conjunction with actions that can be triggered by button actions that have been defined on a form.
For example if the form has been created with a button ‘Add expense’:
form.addButton('createExpense', 'Add expense')The action (createExpense) is provided on the ‘operation’ type in the environment. To react to this button, the following logic could be applied in the script:
if type(operation) == "Action" and operation.name == "createExpense":
    # ...
A shorthand version is also available:
if operation.isActionName("createExpense"):
    # ...

if operation.isEventName("assigned"):
    # ...
The 2 shorthand operations work on either type (Action or Event) of operation so reduces the coding required.
‘V’ or ‘value’
This represents the result that is recorded for the node after successful completion of the script (the payload)
It is initialised to the detail specified by the user, or provided from the current record of the node if the script is executed for a related event.
Values can be changed either through the dot accessor, or by a key. e.g.
value.myTotal = 30
# or
value["myTotal"] = 30
As a suggestion, it is good practice to default values at the start of any script to avoid the use of ‘hasattr’ to check for the existence of an attribute during execution. A clean way of specifying these defaults to reduce code verbosity is shown in the following example (taken from the ‘incident’ script example):
defaults = {
    "title": "",
    "description": "",
    "status": "open",
    "reportedAt": time.now(),
    "startTime": "",
    "endTime": "",
    "closedAt": "",
    "classification": "SEV5",
    "impactSummary": {},
}

for name, defval in defaults.items():
    if not hasattr(value, name):
        value[name] = defval
Note that ‘N’ is also the value of the current node (prior to any user update). This is readonly and represents the version prior to the user update.
All related nodes can also be access from ‘V’ or ‘value’. Those related nodes however cannot be modified.
The result ‘value’ object is used to record the properties that direct nodlins behaviour and display. The properties that are set on the value object are:
image       a data URI or SVG element to display for the node
sizeX       X and Y size in pixels
sizeY
label       short label description to show for the node
summary     description of the node to display in popup tooltop and the 'book' summary view
help        a help description specifically associated with this node and displayed on the 'help' section of node
hasError    if an error in input/user check that you want to display/alert the user
alias       an alias for the node that can be used in named code references
hidden      by default 'hidden' nodes are not displayed (although users can override)
These properties must be set on the result object (V or value). They are not present on the object at start of execution. The user must therefore derive these properties as required from other related and internal detail. If they are not present in the result then the old values are maintained. The image therefore does not need to be evaluated each time but only on change.
All fields are optional on the result.
Note that all non-core fields listed above are required to be specified in the result for the record.
Reviewing payload properties and debugging
The following is a simple script that will print out the properties and methods of the key types listed above, the Operation, Node, Context and Values. When a script is saved, it will execute and the logs available in the log panel.
print("script 1", time.now())

print("OPERATION")
print(operation)
print(dir(operation))

print("NODE")
print(node)
print(dir(node))

print("CONTEXT")
print(context)
print(dir(context))

print("VALUES")
print(values)
print(dir(values))

value.label="script 1"
The logs panel will show the following:
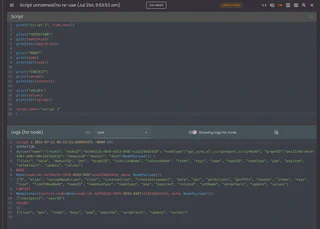
Previous versions of the logs are also available from the selector (up to a limit defined in the script configuration).
The logs can be viewed based on the current node (for which the script is assigned), or the Node (if the script is in use by other nodes).
Accessing node properties
A node is represented by V/value/O.data (updated node), N/node, and a number of list/set results.
All user properties of a node defined in the script can be accessed through a dot (’.’) notation, or through the ‘data’ property of a node.
The following properties are reserved and provide additional detail for a node:
| Property | Value |
|---|---|
| nodeID | the identifier for the node |
| nodeType | the type of the node. Note that this is in FQN (fully qualified name) format |
| nodeSubType | a sub type (if defined for a node). For a script this will refer to the FQN for the script |
| alias | an alias (if defined) for the node |
| label | the label currently assigned to the node |
| related | a list of the relations from the node. Note that this represents only the relations on which the node is dependent |
| R | an abbreviation for the relations for the node (a python list) |
| data | the specific data fields set for the node in the script. Note that these are also available on the node itself through ‘.’ accessors |
Node relationships
The relationships for a node can be accessed for any node using the ‘.related’ or ‘.R’ notation.
The format is:
.related. . => list of nodes e.g.
mymortgage.related.has_schedule.paymentSchedule => [node, node…]
If you want to test whether a specific named relationship exists, you can use the python ‘in’ keyword that applies to dictionaries:
if 'expense' in node.related:
    print(node.related.expense)
This is an appropriate check prior to extracting relationship detail.
The relationships exist for the named relationship, and the user label applied to the relationship but translated to camel case. So for example if the user has created a link to a new node in code:
node.linkToNewNode(FQN="agt_core_all_expressionAgent_number", label="Expense")then the check
if 'expense' in node.related:would apply to ensure that the ‘Expense’ labeled relationship exists.
The relationships are also iterable. In other words if you want to print out the values for each of the relationships that can be referenced:
for myRelation in node.related:
    print("relationship:", myRelation)
The types are also iterable and can be tested with ‘in’ clause. An example of displaying all nodes using relationships and types as iterable python dicts:
for myRelation in node.related:
    print(myRelation)
    # get all nodes for this relation
    for myRelatedNode in myRelation.all():
        print(myRelatedNode)

# Display the keys and types of all related nodes

for n in node.related.all():
    print(n.label)
    for prop in n.data.keys():
        print("prop=", prop, "of type", type(n.data[prop]), "with=", n.data[prop])
In many cases you may only expect and require 1 node over that relationship for that type. You could check the resulting list is length 1, and extract the first element (zero based). e.g.
ps = mymortgage.related.has_schedule.paymentSchedule
if len(ps) == 1:
    foundNode = ps[0]
A shorthand version is provided (hasOne) to extract 1 and only 1 of the nodes. The script will fail if there are more than one relationship. If there are zero relationships then None is returned.
Note that this shorthand is only useful in certain cases for simple scripts. It results in a fail if >1 relationships exist, and no opportunity to handle an error. Reduces code and checks, however if you require to check for success then use alternative methods.
myNode = mymortgage.R.has_schedule.paymentSchedule.hasOne()
print(myNode.years)
This shorthand can also be used at the relationship level without specifying the type if you expect only 1 type over that relation. e.g.
myNode = mymortgage.R.has_schedule.hasOne()
print(myNode.years)
‘hasOne’ can also be directly applied at the node level. The type is optional.
myNode = mymortgage.hasOne("has_schedule", "paymentSchedule")   - returns 1 payment schedule type node over the specified relation.
# or
myNode = mymortgage.hasOne("has_schedule")   - returns 1 node over this relation irrespective of type
Note that the relationships are just for the immediate related nodes for the ‘central’ node. The central node is the node for which the operation (event or action) is being performed.
The ‘hasName’ property can be used on the relationship to access the name associated with the relationship (either the formal relationship name or the user defined label). For example:
# During debugging you can display node detail, the list of formal and user named relationships (see Warning below),
# and the types associated with the relation and relationship name
print("node=", node)
print("node.related=", node.related)
for myRelation in node.related:
    print("myRelation=", myRelation)
    print(dir(myRelation))
    print("relationship name=", myRelation.hasName)
Relationships exist for both the formal relationship name and user defined label
A relationship will exist for both the formal relationship name, and the user defined name given to the relationship.
This is to allow for relationships to be accessed using either terminology. The formal relationship name is preferred as this is constant. The user can change the label on the edge on the Nodlin interface and therefore this would effect the behaviour if user has changed.
The length of the relationships therefore does not dicate the number of relationships on which the node is dependent.
There is repetition if the user has a user defined label defined.
Short/ fully qualified relationship names (FQN)
Nodlin requires fully qualified relationship names to be unambiguous. This format is:
domain_user_agentName_relationship
e.g. core_all_scriptAgent_depends_on
The targets can be other script nodes (core_all_scriptAgent_depends_on) and other agent types.
The target is a list of the different types that match that relationship name.
To simplify we provide a short form without the domain/user/agent, so ‘depends_on’ in the above example. This may overlap with different types of course if they share a relationship name across types, however the type list in the target should can be used to restrict the matches.
For scripts nodes this does not provide a lot of flexibility in that the ‘depends_on’ and type selection will not determine more specific nodes. In this case the user labels (transformed into camel case) can be used to filter connected relations.
e.g. ‘core_all_scriptAgent_depends_on’ with a user label ‘interest payment’ will become ‘interestPayment’. Again the type filter on the target can be used to restrict specific types.
Expressions
Python expressions can be evaluated on a node (as the expression type). This are a different syntax from the normal spreadsheet style formulas but achieve the same result.
The pre-declared variables noted above are not all accessible in expressions.
The result must be either a numeric (float64), condition (boolean true/false), object or list result.
Expressions can combine the numeric & condition nodes, but the result of the expression must be the defined type (number or condition).
An expression can refer to any related aliased node. The ’name’ given to the number or condition can be referred to in the immediate connected node as a normal variable (similar to named cells in a spreadsheet).
A special function, related(), can be used to refer to any connected node and will return a list of a specified property. So for example:
max(related(prop="cost"))will return the ‘cost’ property of all related nodes, and determine the maximum value. By default with no arguments, the ‘value’ or ‘condition’ properties will be obtained if no specific prop is specified. So for example:
max(related())will return the maxium connected node value for any connected number node. The property does not need to be specified as a fully qualified name (FQN), just by the property name. This will work with connected script and non-script nodes.
The full format of the related() function is:
related([prop="<property>"][, relation="relationship" [,type="type"]])If the relationship is specified, then only those nodes over the specified relationship are returned. If you specify a type, then only those types over the specified relationship are returned.
The fully qualified name is an explicit name of a type or relationship. This however is verbose and often not required. The short form is also supported.
These short forms where used must be specified in camelcase format. The following are examples:
FQN: agr_core_all_workflowAgent_next
Referenced by: related(relation="next")

FQN: agr_core_all_workflowAgent_open_question
Referenced by: related(relation="openQuestion")

FQN(type and relation): agt_core_all_workflowAgent_task, agr_core_all_workflowAgent_open_question
Referenced by: related(relation="openQuestion", type="task")
The user labels can also be used in the match, but these must be matched in full (correct case and spaces). Note that the user should take care as the relation() is inclusive of matches, and user labels and shortened FQN references may overlap.
Referenced by: sum(related(relation="my reference"))
Math functions in expressions
In an expression you can refer to math functions.
Average and sum functions are also available on lists:
avg(related())
sum(related())
More complex explanations can be defined with list expressions. For example if you want to sum all related values that are greater than 120:
sum([x for x in related() if x > 120])Retrieve connected nodes as a list
The ‘all()’ method will return a list of nodes. It applies to all node relationships and types, or to a specified relationship irrespective of type. e.g.
myNodeSet = mymortgage.R.all()
myNodeSetOverRelation = mymortgage.R.has_schedule.all()
Note that all does not relate to the fully qualified
Create and link to a new node
Create a new node and a link from the current node.
See the linkToNewNode for details on the function definition.
An internal agent type can be created from its fully qualified name as in the following example:
node.linkToNewNode(FQN="agt_core_all_internalTest_task", label="myInternalTask")Example with a payload:
assignmentPayload = {"trialValue":5}
newAssignmentNode = node.linkToNewNode(scriptFQN="%s", label="myAssignment", payload=assignmentPayload)

# note that 'newAssignmentNode' will contain the reference of the new node (the nodeID).  This can be used to create
# an additional link to that node if a reverse relation is required.
A payload can be assigned and a user defined script as in the following example:
assignmentPayload = {"trialValue":5}
node.linkToNewNode(scriptFQN="...scriptFQN...", label="myAssignment", payload=assignmentPayload)
In cases where you want to create the new node with a reversed link to the current node, you can specify the ‘reverse’ argument:
node.linkToNewNode(scriptFQN="...scriptFQN...", label="myAssignment", payload=assignmentPayload, reverse=True)Actions and Assignments
A node can have a number of actions (with a record of who created and current state), and each action can be assigned to multiple users and/or groups.
Actions can be retrieved for a node and returns a dict of actions (keyed by action id)
N.getActions()The properties of an action can be viewed with dir() (e.g. dir(
Each actions properties can be listed with dir():
for a in N.getActions():
    print(a.allUsers())     # list of users involved across all assignments for the action (including assignee)
    print(a.allGroups())    # list of all groups involved across all assignments
    print(a.actionID)       # each action property can be accessed with the '.' accessor. (see below for list)
Properties of an action are:
"actionID", "active", "comment", "priority", "forDate", "state", "successCondition", "completed",
"createdAt", "updatedAt", "startedAt", "completedAt", "assignments", "createdBy"
Assignments are a list of assignments of the action to users or groups. The properties of an assignment
"assignmentID", "active", "assignedAt", "assignee", "assignedTo", "assignedToGroup"
Example create action followed by a assignment:
# ...create a new node
# important to checkpoint (cannot create an action until the node is successfully created)
C.checkpoint()
actionID = node.createAction(nodeid=newAssignmentNode, forDate=time.parse_duration("25h") + time.now())

# create an assignment for the action
C.checkpoint()
assignmentID = node.createAssignment(nodeid=newAssignmentNode, actionid=actionID, user=("aUser","aDomain"))
The above example could be written in one step:
actionAndAssignmentID = node.assignNewAction(comment="combined test", user=("aUser", "aDomain"))Keywords<
see https://github.com/google/starlark-go/blob/master/doc/spec.md for more detail.
Errors/fail
To abort or stop processing, call fail:
fail("reason for fail")Raw Strings
Raw strings are useful where we require to specify quotes (e.g for SVG strings):
mySVG=r'<svg id="Layer_1" height="512" viewBox="0 0 512 512" width="512" xmlns="http://www.w3.org/2000/svg" data-name="Layer 1"><g fill-rule="evenodd"><path d="m239.231 17.345-85.531 148.138 101.7 28.736-.577-186.011a17.839 17.839 0 0 0 -15.592 9.137z" fill="#ffe178"/><path d="m255.114 232.433-120.418-34.027-30.762 53.281-30.987 53.671 179.601 50.751 2.566-.725z" fill="#ff6a76"/><path d="m252.548 394.404-198.61-56.122-47.578 82.408-6.36 11.015 255.114 72.089v-110.115z" fill="#6df5c2"/><path d="m255.114 393.679v110.115l256.886-68.833-6.041-10.464-50.482-87.436z" fill="#05e59b"/><path d="m255.114 355.384 181.355-51.246-30.283-52.451-30.087-52.114-118.636 33.524-2.349-.664z" fill="#ff4757"/><path d="m257.463 194.8 99.628-28.152-86.2-149.3a17.852 17.852 0 0 0 -15.831-9.142h-.237l.575 186.011z" fill="#ffd369"/></g></svg>'Images
Each node requires an image, and SVG and PNG (base64 encoded) can be specified. Images can also be included in forms (e.g. in a header).
2 constants represent the URI prefix format for the string, webform.SVG and webform.PNG.
If there is no prefix to the image string, then SVG is assumed.
The following shows an example (from cause/effect python script) where an SVG is placed in the title area of the form:
# add static title area
form = webform.new()
titleGroup = form.addGroup("_titleGroup")
titleLeftCol = titleGroup.addColumn("_hrcol", 8, webform.opts(align="left"))
titleRightCol = titleGroup.addColumn("_hlcol", 4)

    titleLeftCol.addStatic("_Header", "h2", "Cause Effect")

    if hasattr(value, "causeEffect"):
    titleLeftCol.addStatic("_SubHeader", "h4", value.causeEffect)

    # add image to the form.  Note that images require a specific URI prefix for SVG or PNG, there are 2 constants defined
    # in the webform module, webform.SVG and webform.PNG.  These are used to prefix the image URI.
    titleIconOpts = webform.opts(align="right")
    titleRightCol.addImage("_causeEffectIcon", webform.SVG+causeEffectIcon, titleIconOpts)
SVG
I would recommend Boxy SVG for generating SVG images.
You can view and copy the SVG text from the editor directly into a python string. You may want to
pass parameters and change certain elements of the SVG document. This can be done with the
The following is an example:
svgString = """
    <svg viewBox......{param1} .....{param2} .... >
"""
myVars = {'param1':20, 'param2': 'someText'}
value.image = svgString.format(**myVars)
A simple workflow in creating graphics:
- create an SVG in Boxy SVG or some editor. A few useful rules:
- name the elements with titles or id’s so simplify locating in the svg text
- if sizing elements, design as full size to determine the limits and resize down
- edit the SVG in a text editor and replace the dynamic elements with the {$
} string - note that only brackets ‘{}’ required. The use of a ‘$’ prefix however helps transparency.
- set the string value in python with a dictionary of the dynamic element names.
- set the value.image to this string
PNG
All PNG images need to be base64 encoded. These strings need have the prefix ‘data:image/png;base64,’ following the URI format. The constant webform.PNG defines this constant.
Textbox & Icons/Symbols/SVG
Nodlin maintains a local service to provide Material Design Icons.
These icons can be used in TextBox images together with any associated text. These can then be used as the image for the node, or used on a form.
The following example places an icon in a textbox with associated text with the icon taking up 30% of the left hand area.
# test load of a valid icon
myImage=image.mdiIcon(group="action", name="paid")

bc=color.Name("blue")
backColor=color.Name("yellow")
myBold = textbox.fontStyle.Bold
textboxOpts = textbox.Options(fontFamily="Roboto_Mono", fontColor="black", fontStyle=myBold, textHAlign=textbox.textAlign.Left, backgroundColor=backColor, borderColor=bc, borderHeight=0.10, icon=myImage, iconSize=0.3)

# test creation of base 64 image
V.image = textbox.Create("Some descriptive text that wraps.  Font, colors and icon are specified.", 300.0, 200.0, textboxOpts)
V.label = "test image box with ICON"
This produces the following icon:

MDI Symbols can also be used and accessible through a different method.
For symbols a color can be specified for the icon used.
# test load of a valid symbol
myImage=image.mdiSymbol(name="change_circle", color=color.Name("blue"))
print("found myImage", myImage)

bc=color.Name("blue")
backColor=color.Name("white")
myBold = textbox.fontStyle.Bold
textboxOpts = textbox.Options(fontFamily="Roboto_Mono", fontColor="black", fontStyle=myBold, textHAlign=textbox.textAlign.Left, backgroundColor=backColor, borderColor=bc, borderHeight=0.10, icon=myImage, iconSize=0.2)

# test creation of base 64 image
V.image = textbox.Create("some descriptive text using MDI symbols in a textbox", 300.0, 200.0, textboxOpts)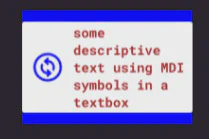
You can also craft your own SVG to display as an ICON.
mySVG=r'<svg id="Layer_1" height="512" viewBox="0 0 512 512" width="512" xmlns="http://www.w3.org/2000/svg" data-name="Layer 1"><g fill-rule="evenodd"><path d="m239.231 17.345-85.531 148.138 101.7 28.736-.577-186.011a17.839 17.839 0 0 0 -15.592 9.137z" fill="#ffe178"/><path d="m255.114 232.433-120.418-34.027-30.762 53.281-30.987 53.671 179.601 50.751 2.566-.725z" fill="#ff6a76"/><path d="m252.548 394.404-198.61-56.122-47.578 82.408-6.36 11.015 255.114 72.089v-110.115z" fill="#6df5c2"/><path d="m255.114 393.679v110.115l256.886-68.833-6.041-10.464-50.482-87.436z" fill="#05e59b"/><path d="m255.114 355.384 181.355-51.246-30.283-52.451-30.087-52.114-118.636 33.524-2.349-.664z" fill="#ff4757"/><path d="m257.463 194.8 99.628-28.152-86.2-149.3a17.852 17.852 0 0 0 -15.831-9.142h-.237l.575 186.011z" fill="#ffd369"/></g></svg>'
fillColor=color.Name("purple")
myImage=image.fromSVG(mySVG, fillColor)

# specify options for the textbox
bc=color.Name("blue")
backColor=color.Name("lightslategrey")
myBold = textbox.fontStyle.Bold
textboxOpts = textbox.Options(fontFamily="Roboto_Mono", fontColor=bc, fontStyle=myBold, textHAlign=textbox.textAlign.Left, backgroundColor=backColor, borderColor=bc, borderHeight=0.10, icon=myImage, iconSize=0.4)

msgText=r'My description for a box with my defined SVG'
V.image = textbox.Create(msgText, 300.0, 200.0, textboxOpts)
The above will result in the following textbox:
Numbers & optional currencies
Numbers can be displayed in a textbox. As with the textbox icon, images can be defined. Numbers can be displayed with a specified precision and currency (optional).
The following example displays a value with a specified SVG icon, currency, and precision.
# Create an image to display in a number textbox
mySVG=r'<svg id="Layer_1" height="512" viewBox="0 0 512 512" width="512" xmlns="http://www.w3.org/2000/svg" data-name="Layer 1"><g fill-rule="evenodd"><path d="m239.231 17.345-85.531 148.138 101.7 28.736-.577-186.011a17.839 17.839 0 0 0 -15.592 9.137z" fill="#ffe178"/><path d="m255.114 232.433-120.418-34.027-30.762 53.281-30.987 53.671 179.601 50.751 2.566-.725z" fill="#ff6a76"/><path d="m252.548 394.404-198.61-56.122-47.578 82.408-6.36 11.015 255.114 72.089v-110.115z" fill="#6df5c2"/><path d="m255.114 393.679v110.115l256.886-68.833-6.041-10.464-50.482-87.436z" fill="#05e59b"/><path d="m255.114 355.384 181.355-51.246-30.283-52.451-30.087-52.114-118.636 33.524-2.349-.664z" fill="#ff4757"/><path d="m257.463 194.8 99.628-28.152-86.2-149.3a17.852 17.852 0 0 0 -15.831-9.142h-.237l.575 186.011z" fill="#ffd369"/></g></svg>'
fillColor=color.Name("red")
myImage=image.fromSVG(mySVG, fillColor)

# Specify options for the textbox
bc=color.Name("blue")
backColor=color.Name("white")
myBold = textbox.fontStyle.Bold
textboxOpts = textbox.Options(fontFamily="Roboto_Mono", fontColor=bc, fontStyle=myBold, textHAlign=textbox.textAlign.Left, backgroundColor=backColor, borderColor=bc, borderHeight=0.10, icon=myImage, iconSize=0.2)
V.image=textbox.Number(25300.12,300,200, numberOptions=textbox.NumberOptions(currency="GBP", scale=2), textboxOptions=textboxOpts)
The above example produces the following image for the node:

Drawing your own node in python
You can define your own icon in code with circles, paths, lines, and rectangles.
r = color.RGBA(R=245, G=69, B=8, A=1)
circle = gridder.CircleConfig(radius=40.0, stroke=False, color=r, strokeWidth=4.3)
circle2 = gridder.CircleConfig(radius=30.0, stroke=True, color=color.Black)

imageConfig = gridder.ImageConfig(width=600, height=400)
gridConfig = gridder.GridConfig(rows=6, columns=8, lineStrokeWidth=2.1, borderStrokeWidth=10.1)
print(dir(gridConfig), gridConfig)

myImage = gridder.New(imageConfig, gridConfig)

stringColor = color.HEX("#8A2BE2")
myFont = font.face(size=60.1, name="italic")
myFont2 = font.face(size=50.1, name="mono")
myStringConfig = gridder.StringConfig(color=stringColor)
myImage.DrawString(1, 4, "Nodlin", myFont, myStringConfig)
myImage.DrawString(2, 4, "$23,121,443", myFont2, gridder.StringConfig(color=color.Name("red")))

lineCircle = gridder.CircleConfig(radius=30.0, stroke=False, color=r, strokeWidth=2.2)
for x in range(8):
    myImage.DrawCircle(3, x, lineCircle)

myPath = gridder.PathConfig(strokeWidth=2.1, color=color.Black, dashes=1.5)
myImage.DrawPath(1, 1, 5, 7, myPath)

myRectColor = color.RGBA(R=1, G=255, B=80, A=1)
myRectangle = gridder.RectangleConfig(width=40.1, height=120.1, color=myRectColor, rotate=50.0)
for recCol in range(3):
    myImage.DrawRectangle(4, 2+recCol, myRectangle)

myImage.DrawCircle(2, 2, circle)
myImage.DrawCircle(5, 3, circle2)

lineColor = color.RGBA(R=80, G=200, B=80, A=1)
myLine = gridder.LineConfig(length=160.2, rotate=12.1, color=lineColor, strokeWidth=30.0)
myImage.DrawLine(2, 1, myLine)

myImage.PaintCell(1, 1, color.Name("mediumspringgreen"))

# list available colors
print("colors=", color.colors)

V.image = myImage.GetImage()
This produces the following example:
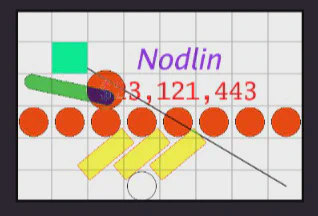
Charts
Nodlin provides access to the quickchart server for creating chart images. Note that for simple use cases (line/bar charts) you can use the internal chart node type (in the expression agent type) which provides user configurable color, title, size etc on the chart form.
Quickchart however provides many more options and styles, and this can be used directly to produce an image for the node but requires more extensive python code to formulate a request. Nodlin provides a simple method for which to make the JSON request to quickchart to obtain a PNG image. See quickchart for more details on the JSON structure and available styles.
See objectiveChart.py for a comprehensive example that produces the following as example:
V.sizeX = 400
V.sizeY = 400

chart = {
    "type": "radar",
    "data": {
        "labels": value.subObjectives,
        "datasets": datasets
    },
    "options": {
        "title": {
            "display": True,
            "position": "top",
            "fontSize": 22,
            "fontFamily": "sans-serif",
            "fontColor": "#f2ecec",
            "fontStyle": "bold",
            "padding": 10,
            "lineHeight": 1.2,
            "text": value.objectiveTitle
        },
        "scale": {
            "id": "radial",
            "display": True,
            "stacked": False,
            "distribution": "linear",
            "ticks": {
                "display": False,
                "min": 0,
                "max": 100,
            },
            "pointLabels": {
                "display": True,
                "fontColor": "#f2ecec",
                "fontSize": 10,
                "fontStyle": "bold"
            },
            "gridLines": {
                "display": False,
            },
            "angleLines": {
                "display": True,
                "color": "rgba(222, 139, 17, 0.7)",
                "borderDash": [
                  0,
                  0,
                ],
                "lineWidth": 1
                },
            },
            "plugins": {
              "datalabels": {
                "display": True,
                "backgroundColor": "#eee",
                "borderRadius": 6,
                "borderWidth": 1,
                "padding": 2,
                "color": "#666666",
                "font": {
                  "family": "sans-serif",
                  "size": 10,
                  "style": "normal"
                }
              },
            },
        }
    }
chartSpec = {"backgroundColor": "transparent", "width": V.sizeX, "height": V.sizeY, "chart": chart}
print(type(chartSpec))
V.image = image.chart(chartSpec)
Defaults
Obtaining a value and defaulting. Testing the existance of a value can be more cumbersome each time you want to check before using. For example:
if hasattr(expense, 'value'):
    totalsgAndA = totalsgAndA + expense.value
However you can use getattr to specify a default if value does not exist
totalsgAndA = totalsgAndA + getattr(expense, 'value', 0)The syntax is:
getattr(x, name, default)If you wanted to obtain a named value from the values prop, and a default if it does not exist, you can obtain a default for a dictionary as follows:
values.get("N", 0)Which would get an aliased 'N' node from the 'values' dictionary with 0 if value not present.
List Comprehension
Lists can be combined:
nums = [1, 2, 3, 4, 5]
letters = ['A', 'B', 'C', 'D', 'E']
nums_letters = [[n, l] for n in nums for l in letters]
print(nums_letters)
Comphrehensions are not limited to lists. A set example:
dict_comp = {x:chr(65+x) for x in range(1, 11)}
print(dict_comp)
Example showing test for all ’true’ values for property in list of dicts using list comphrehension:
customers = [{"is_kyc_passed": False}, {"is_kyc_passed": True}]
matched = all([customer["is_kyc_passed"] for customer in customers])
print(matched)
Forms
todo: move this to a specific forms document
addUserInput
To provide a user selection control use addUserInput
userOpts = webform.nodlinUserOpts(help="user help...", singleContactOnly=False)
form.addUserInput('responsible','Responsible', userOpts)

if 'responsible' in value:
    for u in value.responsible['users']:
        print("USER %s in domain %s" % (u['userid'], u['domain']))
    for g in value.responsible['groups']:
        print("GROUP %s in domain %s" % (g['group'], g['domain']))
The above example will return a single contact (in options) with specified help. The result is recorded in the responsible property of the value payload. The property is a dict containing a list of users (the users prop) and groups (the groups prop). The list of users is a list of dict type with the two props userid and domain. The group list is a list of groups with the group and domain props.
Date & Datetime inputs
Date and datetime inputs are handled through the addDateInput method on a form.
The method takes the form general options, and a specific optional list of dateInputOpts.
The date formatting tokens in vueform are as moment.js.
The following are the options that can be specified on dateInputOpts:
time                allow time input
displayFormat       format to display on the form
loadFormat          format expected in the date string on record
valueFormat         format expected in the date string result
min                 date input is restricted to dates within the min/max definition
max

e.g.
    dateOpts = webform.dateInputOpts(time=True, min='2025-07-01 00:00',displayFormat='YYYY-MM-DD')

Note that UTC is formatted as 'YYYY-MM-DDTHH:mm:ss[Z]', e.g. "2025-07-16T13:45:00Z"
Example python script with 2 date inputs allowing for time entry:
# add the start time and end time
timeGroup = form.addGroup("_timeGroup")
timeLeftCol = timeGroup.addColumn("_trcol", 6, webform.opts(align="left"))
timeRightCol = timeGroup.addColumn("_tlcol", 6)

# date and times for reported and resolved fields
myDateOpts = webform.dateInputOpts(time=True)
timeLeftCol.addDateInput("reportedAt", webform.opts(label="Reported at", info="Time incident was first reported."), myDateOpts)
timeRightCol.addDateInput("resolvedAt", webform.opts(label="Resolved at", info="Time incident was resolved in the business impacted area."), myDateOpts)
Add static HTML to a form
Static HTML can be added to a form with standard HTML formating.
The following is an example from the incident.py script, showing the HTML formed from a string template (to add content derived during script execution) and displayed on the form:
higherClassifiedImpacts = "orders not processing (SEV1);"
warningTemplate = """
<p style="color: orange;">Higher severity impacts exist for this Incident. Review incident classification:</p>
<p style="color: orange;">{higherClassifiedImpacts}</p>
"""
params = {'higherClassifiedImpacts': higherClassifiedImpacts}
showWarning = warningTemplate.format(**params)
form.addStatic("_clasificationAlert", "div", showWarning)
Add Markdown to a form
In some cases it may be simpler in a script to build a markdown string during execution and then display this on a form. To support this a ‘markdownAsHTML’ method exists on the form, and can be subsequently added to the form using the addStatic method.
The following example defines a markdown string, applies a conversion to HTML, and then uses the conventional div tag to add to the form:
# example production of markdown converstion to html, to present as static content
myMarkdown = """
# markdown title
some text
## markdown sub title
some additional sub text
"""
myHTML = form.markdownToHTML(myMarkdown)
form.addStatic("_markdown", "div", myHTML)
Tabs on a form
Nodlin forms support addition of Tabs. Under the covers the excellent Vueform library is used which provides the capability of specifying a form in a JSON format, and therefore is data driven.
Having a data driven approach allows us to dynamically change and interrogate properties the form. For example, in Nodlin we have a ‘Board’ and a ‘Gantt’ view of the nodes, and we determine nodes that have date types, or option types, from interrogation of the nodes form. You can build and view example forms with their form builder.
If tabs are required, then any controls (text, number inputs, static elements etc), need to be associated with one of the tabs to be displayed. This can be done individually for each new control, or more simply by creating and adding a single control group to a tab, and then adding the controls to the appropriate group.
The following highlights an example of how you can do this.
form = webform.new()

########################################################################
# If separate Tabs are required on a form, the following is the recommended approach.
#
# When elements are added to a form, they are added to the 'schema' for a form.  If there are tabs, then the elements added to the form, need to be placed
# on one of the tabs.  If there are no tabs, all the controls are placed on the form in the order they have been added.
#
# The most straight forward approach with tabs is to:
# a/ create a tab (the 'tab' response only supports the addition of an element)
# b/ create a group associated with the tab (the group is created on the form but we logically associate with the tab)
# c/ add the group as an 'element' on the tab
# d/ add all the controls (buttons, text etc) to the group

detailTab = form.addTab("_detail", "Detail")
detailGroup = form.addGroup("_detailGroup")
detailTab.addElement("_detailGroup")

settingsTab = form.addTab("_settings", "Settings")
settingsGroup = form.addGroup("_settingsGroup")
settingsTab.addElement("_settingsGroup")

# from here we add specific detail to the created groups (detailGroup and settingsGroup)

myopts = webform.opts(label="Name", info="Please enter a real name franks")
textOpts = webform.textInputOpts(inputType="text")
detailGroup.addTextInput("myName", myopts, textOpts)
detailGroup.addNumberInput("height", webform.opts(label="Height (m)", info="Enter height (in meters)"))
detailGroup.addStatic("_myStatic", "p", "Some static detail...")
detailGroup.addButton("save", "Submit", webform.buttonOpts(submits=True))


settingsGroup.addNumberInput("age", webform.opts(label="Age", info="Enter age (in years)"))

lCol = settingsGroup.addColumn("lcol", 6)
lCol.addTextInput("job", webform.opts(label="Job"))

rCol =settingsGroup.addColumn("rcol", 6)
rCol.addTextInput("location", webform.opts(label="Location"))

settingsGroup.addButton("save", "Submit", webform.buttonOpts(submits=True))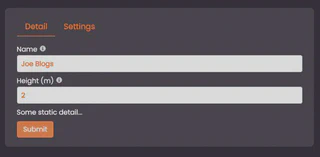

Starlark Syntax
Comments
Single line comments are preceeeded by a ‘#’.
Multiple line comments (aka docstrings in python parlance) use 3 quotes:
"""
this is a docstring comment
"""
Summary
The summary display displayed for a node is set through the following:
value.summary = "this is a summary"To create a running commentary in a script use an array and join the results when complete:
commentary = []
commentary.append('notes...')
value.summary = "\n".join(commentary)
The commentary is displayed in markdown.
Print (logging)
print() provides a mechanism to log in scripts and useful for debugging. It takes a tuple argument for including values. Note that starlark does not support the python ‘%’ options.
See ‘string interpolation’:
https://github.com/bazelbuild/starlark/blob/master/spec.md#string%C2%B7format
Some useful examples:
x = 0.5
print("my float=%f" % (x))  # prints the longer float
print("my float=%g" % (x))  # prints a compact form (0.5)
print("my float=%s" % (x))  # prints str(x)
print("my float=%r" % (x))  # prints repr(x)
% none literal percent sign
s any as if by str(x)
r any as if by repr(x)
d number signed integer decimal
o number signed octal, no 0o prefix
x number signed hexadecimal, lowercase, no 0x prefix
X number signed hexadecimal, uppercase, no 0x prefix
e number float exponential format, lowercase (1.230000e+12)
E number float exponential format, uppercase (1.230000E+12)
f number float decimal format (1230000000000.000000)
F number same as %f
g number compact format, lowercase (0.0, 1.1, 1200, 1e+45, 1.2e+12)
G number compact format, uppercase (0.0, 1.1, 1200, 1e+45, 1.2E+12)
Additional starlark libraries included
DateTime
The DateTime library provides a number of useful methods for working with dates and times.
	Date
	Now
	StartOfMonth
	AddMonths
	FirstDaysForMonths
	EndOfMonth
	DaysInMonth
	TruncateToDay
	Format
Example:
myYear = 2025

t = datetime.Date(year=myYear, month=8, day=19, tz="Europe/London")
print("t=", t)

formatted_date = datetime.Format(datetime.StartOfMonth(t), "2006-01-02")
print("StartOfMonth=", formatted_date)


monthEnd = datetime.Format(datetime.EndOfMonth(t), "2006-01-02")          # "2025-08-31" (00:00 start of last day)
print("EndOfMonth=", monthEnd)

datetime.DaysInMonth(t)                               # 31
print("DaysInMonth=", datetime.DaysInMonth(t))

print("TruncateToDay=", datetime.Format(datetime.TruncateToDay(datetime.Now(tz="UTC")), "2006-01-02"))

##### First day of each month between two dates (inclusive by month)

s = datetime.Date(year=2024, month=11, day=15, tz="UTC")
e = datetime.Date(year=2025, month=2,  day=3,  tz="UTC")
print("FirstDaysForMonths=", datetime.FirstDaysForMonths(s, e))
The above example will output:
t= 2025-08-19 00:00:00 +0100 BST
StartOfMonth= 2025-08-01
EndOfMonth= 2025-08-31
DaysInMonth= 31
TruncateToDay= 2025-08-19
FirstDaysForMonths= [2024-11-01 00:00:00 +0000 UTC, 2024-12-01 00:00:00 +0000 UTC, 2025-01-01 00:00:00 +0000 UTC, 2025-02-01 00:00:00 +0000 UTC]
math
time
print("time:", time.now())
print("time in 1 days:", time.parse_duration("24h") + time.now())
Valid time units are "ns", "us" (or "µs"), "ms", "s", "m", "h".
e.g. To obtain a list of 1-12, 3 times, as a list:
[r for i in range(3) for r in range(1,13)]This can be used to create a vector of months looking out 3 years for example.
Say you wanted a list of 5% increments month over month:
[s+(l) for s in [20] for l in range(12)]l = [time.parse_duration("%dh" % (24*n)) + time.now() for n in range(20)]
#or
[(time.now() + time.parse_duration("24h") * i).format("2006-01-02") for i in range(50)]
print(dir(l[1]))
print(l[1].month)
[r.month for r in [(time.parse_duration("%dh" % (240*n)) + time.now()) for n in range(20)]]
[r in [range(12),range(12)]]Struct
The Struct type in starlark is a dictionary type. Although currently included in Starlark this will be removed. The dict is recorded (but no methods) in the UDT, but the data cannot be represented in JSON and therefore does not unmarshal into the named type given to the struct. This is a TBR at some future point.
python - months does not exist
To obtain the current date and display in a specific format:
now = time.now()
print (now.format("2006-01-02 15:04:05"))
for i in range(1,13):
months_choices.append((i, datetime.date(2008, i, 1).strftime('%B')))See the following for time related functions: https://pkg.go.dev/go.starlark.net/lib/time https://pkg.go.dev/time#ParseDuration
from_timestamp(sec, nsec) - Converts the given Unix time corresponding to the number of seconds
                            and (optionally) nanoseconds since January 1, 1970 UTC into an object
                            of type Time. For more details, refer to https://pkg.go.dev/time#Unix.

is_valid_timezone(loc) - Reports whether loc is a valid time zone name.

now() - Returns the current local time. Applications may replace this function by a deterministic one.

parse_duration(d) - Parses the given duration string. For more details, refer to
                    https://pkg.go.dev/time#ParseDuration.

parseTime(x, format, location) - Parses the given time string using a specific time format and location.
                                 The expected arguments are a time string (mandatory), a time format
                                 (optional, set to RFC3339 by default, e.g. "2021-03-22T23:20:50.52Z")
                                 and a name of location (optional, set to UTC by default). For more details,
                                 refer to https://pkg.go.dev/time#Parse and https://pkg.go.dev/time#ParseInLocation.

time(year, month, day, hour, minute, second, nanosecond, location) - Returns the Time corresponding to
                                                                        yyyy-mm-dd hh:mm:ss + nsec nanoseconds
                                                                     in the appropriate zone for that time
                                                                     in the given location. All the parameters
                                                                     are optional.
json
Internal type implementation
The following defines the interface types that must be implmented to a type to be supported:
https://github.com/google/starlark-go/blob/master/starlark/value.go